Before we start with this example for connecting and reading data from a MySQL database, we assume that you already have a JSP/Servlet container like Apache Tomcat, Jetty etc. and a MySQL database installed on your computer.
An easy to understand article about installing Apache Tomcat can be found in previous tutorials here on Librescript.
For simplicity, we will not use Maven, Spring MVC or Spring Boot in this tutorial, but these are powerful frameworks and you should consider using them in larger JSP/Servlets projects.
After we have set up MySQL, we want to create a table and fill it with some data. Open the MySQL Monitor or any MySQL GUI and type:
|
1 2 3 4 5 6 7 8 9 10 11 12 13 |
CREATE TABLE `pupils` ( `id` int(11), `name` varchar(255), `surname` varchar(255) ) INSERT INTO `pupils` (`id`, `name`, `surname`) VALUES (1, 'Elza', 'Lipke'), (2, 'Xuan', 'Rochin'), (3, 'Mozell', 'Pelkowski'), (4, 'Heike', 'Berganza'), (5, 'Jerry', 'Zurcher'); |
Tip:
You can check if the MySQL server is responding on a command prompt or terminal by typing:
Windows/Linux: telnet localhost 3306
macOS: nc -vz localhost 3306
Since we want to understand how JSP/Servlets work under the hood, we will not use IDEs like Eclipse, IntelliJ, etc. and will set up the whole project manually.
Navigate to the Apache Tomcat installation folder and open the webapps folder.
Create a new folder called jdbc-example, a subfolder called WEB-INF and a subfolder called lib. Also create an index.jsp file in the jdbc-example folder
Download mysql-connector-java-8.0.19.jar from https://dev.mysql.com/downloads/connector/j/, unzip the file and place it in the WEB-INF/lib folder
└── jdbc-example
└── WEB-INF
└── lib
└── mysql-connector-java-8.0.19.jar
└── index.jsp
Add the following code to the JSP file (index.jsp)
|
1 2 3 4 5 6 7 8 9 10 11 12 13 14 15 16 17 18 19 20 21 22 23 24 25 26 27 28 29 30 31 32 33 34 35 36 37 38 39 40 41 42 |
<%@ page import="java.sql.*"%> <html> <head> <title>JSP with JDBC connecting to a MySQL database</title> </head> <body> <h1>JSP with JDBC connecting to a MySQL database</h1> <h1>Data from table pupils in the demo_database</h1> <% try { String connectionURL = "jdbc:mysql://localhost:3306/demo_database"; Connection connection = null; Statement statement = null; ResultSet rs = null; connection = DriverManager.getConnection(connectionURL, "root", "12345678"); statement = connection.createStatement(); String SQLQuery = "SELECT id, name, surname from pupils"; rs = statement.executeQuery(SQLQuery); while (rs.next()) { int id = rs.getInt("id"); String name = rs.getString("name"); String surname = rs.getString("surname"); out.println(id + " " + name + " " + surname + "<br />"); } statement.close(); connection.close(); } catch(SQLException e) { out.println("SQLException caught: " +e.getMessage()); } %> </body> </html> |
Launch Apache Tomcat. Navigate to the Tomcat folder and type:
Windows/Linux: bin\catalina.bat start
macOS: bin/catalina.sh start
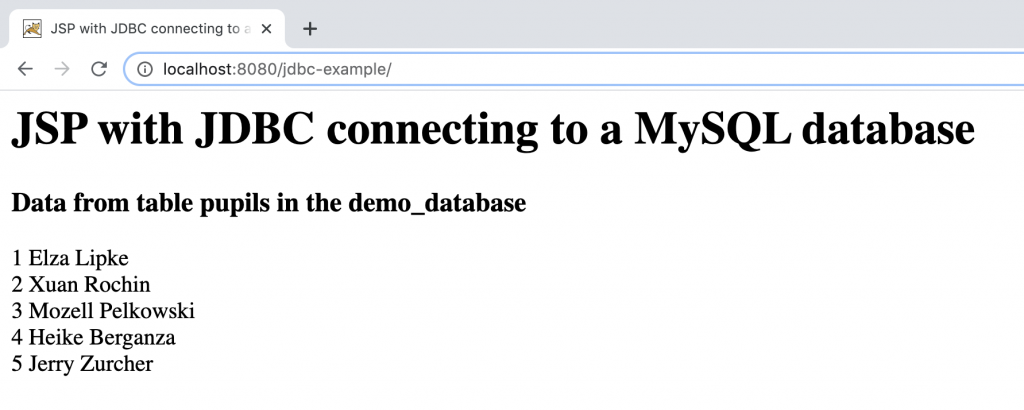
And finally, open a browser and call up:
Common SQL exceptions thrown during the execution of JSPs/Servlets and how to resolve them:
Communications link failure. The last packet sent successfully to the server was 0 milliseconds ago. The driver has not received any packets from the server.
Server is down. Start MySQL Server
SQLException caught: The server time zone value ‘CEST’ is unrecognized or represents more than one time zone. You must configure either the server or JDBC driver (via the ‘serverTimezone’ configuration property) to use a more specifc time zone value if you want to utilize time zone support.
Append the parameter serverTimezone to the connection string.
String connectionURL = “jdbc:mysql://localhost:3306/demo_database?serverTimezone=UTC”;
Final note:
Establishing a JDBC connection in a JSP is not good practice, we have done it here to keep the tutorial as simple as possible. Try to avoid writing much Java code in JSPs, because JSPs are views and Java code belongs in servlets.


